Sharing experiences and learnings in the world of dog sports
  • Home
  • About
  • Contact
  • Events
  • Blog: Training Articles and other musings
  • My Dogs' Adventures
  • Testimonials

Musings - Past, Present and Future

Over the years, I have written many articles and handouts for students of both competition obedience and basic family dog training.  I'll be posted some of these here from time to time in case they might be helpful.  And I'm sure to come up with some new items, too. Please also visit "My Dogs' Adventures" page to for more training and adventure posts. Enjoy!

My Dogs' Adventures

Perching for Fabulous Fronts & Fantastic Finishes

11/17/2014

0 Comments

 
One of the more challenging aspects of training for competition obedience can be teaching our dogs to align themselves with us precisely, in front and at heel.  In effect, the dog needs to be able to move his or her hind end independently from the front end.  This can be a difficult skill and is one the dog doesn’t often need in everyday life.  Once mastered, however, dogs can learn to find front and heel position on their own with considerably greater ease.  

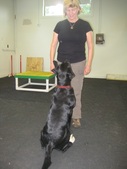
The “perch”, a small raised platform for the dog’s front feet, can be a very useful tool to help teach the body mechanics needed.  I first learned about the perch from an agility friend a bunch of years ago.  Since that time, “perch work” has grown in popularity across many dog sports and is now widely used as a training tool by top obedience and Schutzhund trainers in the US and abroad.  

For the perch itself, It’s helpful to start with an object several inches tall (3 – 10 or so, depending on your dog’s size) to clearly isolate front feet from back.  Once your dog has the idea, a lower object can be used and then faded completely.  You can go fancy or basic, but whatever you use should be sturdy and stable (wobbling will set you back!), non-slip, and large enough for front feet but not so large as to encourage the dog to put her whole body on it (that would then be a platform, another useful tool).  Feel free to start with something larger than you will eventually use if your dog has trouble putting her front feet on it at first.  An upside down heavy rubber feed tub or hard plastic bowl fitted with a non-slip surface, a thick phone book wrapped in heavy duty non-slip tape, or a wide upside down flower pot or base are easy choices to find.  Creative types can make perches and platforms from wood or sturdy foam.

I’ll describe the basic steps below.

Step one is to teach the dog to eagerly put her front feet on the perch.  A clicker is useful to mark the moment she’s up, but a marker word (e.g., “Yes”) is fine, too.  You can lure the dog onto the object and mark and reward when her front feet arrive on the perch.  You could also wait for her to step up (no lure) if she’s used to offering behaviors involving her front feet.  In any case, be sure to deliver the treat with the dog’s head up and over the perch so her front feet stay anchored.   Toss a reset cookie to get the dog off (use visible food to avoid snuffling!) or simply release her off so she can learn that getting up on the perch is what gets the reward at first.

Once your dog is able to get her front feet on and stay up comfortably, toss a reset cookie directly behind her, telling her to "Get it" or "Find it", and encourage her to come straight back to you, ending up in front again.  If she comes in at an angle, move YOURSELF so she lands in a perfect front position (no sit required).  This will give her the picture of having her spine aligned perfectly with the center of your body. You can feed her at the center of your body, or spit a cookie if she can catch, to further reinforce the position.  Toss another reset cookie and repeat.  Do this several times, then toss a reset cookie off to one side, align yourself so she comes in straight, feed at center of your body, then toss to the other side.  Do this in short sessions (1 - 5 minutes) over the course of a few days so your dog really gets happy about front feet on the perch.


The next step is designed to help your dog learn to move her hind feet while keeping her front feet on the perch.  This is useful for both finding front after retrieves and jumps and finding heel position.  With her front feet on the perch, encourage her to move a back foot to the side while keeping her front feet anchored.  You can do this in several ways, but keeping a food lure close to the front and center of your body and moving yourself slightly around the perch (stay very close) so the dog moves to stay in front of you tends to work well.  You can also try moving yourself towards one of the dog’s hips, putting spacial (or even physical) pressure on her to move at first, marking and rewarding as above.  Or, you could wait for her to offer back foot movement (although you might be waiting a long time unless she's really savvy about shaping!). In the beginning, mark and reward the SLIGHTEST hind end movement - or even the weight shift that would precede hind foot movement.  Your dog will catch on quickly if you break the exercise down into tiny steps.  Remember to treat above your dog's head so her front feet stay on the perch. 

Be sure to watch your dog's hind end and not her eyes, lest you get in a staring contest!  Do 5 or 10 reps and take a break, letting her get off and removing access to the perch (pick it up!).  Stay at this step until the dog is moving around smoothly as you move. Be sure to mark when the dog is MOVING her back feet, not when she stops (its fine to feed after she hears the marker and stops for her cookie).

Next, have her go the other direction.  It’s easy to focus on having her move only toward your left if heeling and finishes are your goal, but it doesn’t create a balanced dog.  Plus, you may want to do freestyle, agility or another activity one day where comfort on your right side is useful.

In these beginning steps, you are basically asking your dog to remain in the “front” position as you move to encourage her to move.  It’s fine to help the dog with a food lure.  Just remember, the body follows the head/nose, so be aware of your hand position.  If the dog isn’t moving in the manner you’re looking for, your food lure probably isn’t in the right place!  

I like to fade the food lure at this point before moving on.  This makes it easier for our dogs to understand how to find front in addition to ultimately how to find heel. To fade the lure, place your hands at your sides (or behind your back) and wait for the dog to look up.  Mark and reward at the center of your body (or from your mouth) a few times. Then, move yourself slightly as above and wait for the dog to offer the slightest hind foot movement to stay in front.  Mark and reward.   

Next, stand to the right side of the perch and have your dog step onto it beside you, standing in heel position.  Use a lure, if needed.  You could do this by a wall or barrier at first to encourage your dog to be straight by your side.  Move a bit to your right around the perch and encourage your dog to move into you.  Using a lure to turn her nose away from you can help the hind end come in.  Be sure to keep the food up over the dog’s head to keep her on the perch and to prevent her neck from bending excessively.  Mark and reward VERY small steps at first, then ask for more.  Then, stand still and ask her to move a few steps into you on her own.  Once she’s moving smoothly, fade your lure if you’re using one.    If your dog is coming into you reliably as you move, you can name it (“heel”, “get it in”, etc.).

You can do this in the other direction, so your dog moves away from you to stay in heel position, and then try it with your dog on your right side (not so easy for many of us, or our dogs!).
   
If you have questions or would like to try it with your dog, feel free to email me … or better yet, come to obedience class!  
0 Comments

Training for attitude: some lessons learned ...

8/21/2014

0 Comments

 
Picture
“Training for attitude: some lessons learned …”

To me, few things are more awe-inspiring than a flawlessly choreographed performance in competition obedience. The sight of a dog and handler moving together with style and fluidity is poetry in motion. Contrast that picture to one in which the dog goes through the motions of the exercises by rote, without enjoyment or energy.  The handler’s body language may be similarly uninspired or may even convey frustration, disgust or despair.  The dog may “do” everything, but there is no spark.

Attitude -- of confident eagerness for the work -- can change a precise performance from robotic to riveting. 

In some dog sports, eagerness may come naturally -- herding for herding dogs, field work for retrievers, agility for many dogs, K9 Nosework for most dogs!    It’s a rare gem of a dog who has a natural and sustained eagerness for competition obedience over a full career.

Success in competition obedience is a marathon, not a sprint. Over time, one can fall into some common traps that can drain the dog (and handler!) of attitude and enthusiasm.  Repetitive and/or overly long training sessions; too much formal “testing” (in place of training); a consistent focus on problems rather than achievements; training when the dog is exhausted, under the weather, etc.; letting the dog get things wrong too many times in a row: such things can sneak up until one day, we notice our once eager dog is slow, dull, lagging, scratching, balking, inattentive, clingy, or just plain quitting on us. 

Following are some suggestions based on my experience. The list is hardly exhaustive and will be a reminder for most long-timers, but I hope it will spare some newer enthusiasts and their dogs some angst and retraining!

Train a dog who is eager to train!  Sounds obvious, but it’s easy to get in a rush and forget to adequately prepare the dog mentally or physically before starting the session.  Take a few moments to play together.  Do some food toss recalls.  Ask for some tricks or a favorite behavior.  Do what it takes to get your dog engaged with you from the get go.

Actively train attitude – drive, speed, even specific body affect like head up or ears forward – in addition to precision.    By rewarding slow, laggy behavior, even if it’s technically “correct,” you can inadvertently train a slow, dull response!  Of course, your dog may perform slowly as he’s first learning a new task, but once the mechanics are in place, get him working briskly.  (Note how many times “brisk” is noted as a requirement in the regulations!)

Train, don’t nitpick or nag.  If the dog “fails” at something twice in a row in a session, take the exercise apart, analyze the pieces, find out what’s broken or unclear, and help the dog get back on track. Don’t be afraid to go all the way back to square one if need be.

But don’t stay too long at one level or make things too easy, either!  Dogs, like people, can get bored by too many easy repetitions.  Challenge the dog… thoughtfully and fairly ..  to do better, as you would challenge yourself.

Focus on successes; plan for problems.  If we focus too much on what’s wrong rather than right, the attitude of both dog and handler will suffer.

Quit while the dog is eager for more.  Avoid the “just one more” syndrome.  Several short sessions are better than one long one.

Break things up during the session.  After a few good training minutes, break it off and play tug, toss a ball, run together, etc.  Keep the dog guessing and the distinction between play and work will largely disappear.

Vary your rewards.  If you usually hand your dog a treat, roll the treat on the ground and say, “find it!” instead. Toss the ball through your legs rather than away from you.  Give 5 tiny treats in a row, making a big fuss over each one. Break off and run around the yard with the dog.  Variety helps keep the session fun and interesting for both of you.

Plan your sessions and keep a training log.  Not only will you stay honest about what your dog really knows, you’ll clearly see your progress over time.

Trial when you’re ready, not before.  The stress of trials does strange things to handlers and dogs!  Make sure your training is rock solid and your proofing is iron clad before entering the ring for real.

Cross train with your dog. Doing other dog sports can enhance your relationship, improve your dog’s attitude toward training, and take the pressure off for both of you.

Finally, if your attitude is bad – if you’re mad, frustrated, etc. – put your dog away and train another time. OR train anyway, and double the rewards you give the dog for hanging in there with you!

Happy training!


0 Comments

"Smile, handlers. It's only a dog show!"

8/21/2014

0 Comments

 
OBEDIENCE TRAINING TIP:  Handlers: Help or Hindrance in the Ring?

By Mary Horne, CPDT-KA, Competition Obedience Training Director

As “dog trainers,” we tend to place a lot of focus on our dog’s skills as we prepare to compete; are her stays reliable? Will he run around the high jump?  Have we proofed her enough to perform outdoors?   These things are certainly important, but we would also be wise to consider how our own behavior impacts our dog’s performance.  There are many things we can do to improve our chances of success in the ring.  Here are a few:

1.    Read the rule book!   The AKC Obedience Regulations – available as a download online at www.akc.org or in book form from the AKC’s online store – is an invaluable resource.  Not only does it contain general showing guidelines and detailed rules and scoring for each obedience class, it lets an exhibitor in on key elements judges are to look for in each performance.  Read it, and then read it again!

2.    Train like you trial, and trial like you train.  If you’re a chatter box to your dog in training and become silent in the ring (as you must), your dog is likely to become stressed and confused.   Similarly, if you give a treat every 5th step in heeling– or worse, lure your dog around the exercises in training -- don’t be surprised if your dog gives up midway through the class.  Well before you send your show entry in, make sure your dog is used to working intently and for longer periods than you’ll actually need for praise and petting between exercises and a nice jackpot at the end.

3.    Learn the best pre-trial routine for your individual dog.  Some dogs need an active warm up, while others do better to rest before their turn.  Some need a lot of time to take in the show environment while others acclimate immediately.  Some need training reminders the week before the show, while others do better if they have a mental break.  Know your dog and how best to help him before the performance.

4.    Get to your ring early and watch a few dogs before you so you will know where to set up, what the heeling pattern is, and where each exercise will take place. Visualize the two of you moving smoothly around the ring together before you go in.

5.    Have a plan for entering and exiting the ring.  Your performance effectively begins before you cross the ring gates and doesn’t end until you are well outside the area.  Stay connected with your dog throughout.

6.    Once you begin an exercise, let the dog make the mistakes. A classic error of new exhibitors is slowing down to wait for their lagging dogs during heeling.  It’s too late to fix a training problem once you’re at the show, so if your dog lags, just keep moving and follow the judge’s instructions. Both of you are scored in obedience, so if you at least do your job, you might still qualify. 

7.    Use time between exercises wisely.  Take this time to reconnect with your dog and relax him by praising and petting him, telling him how handsome he is, or doing some discreet tricks like touch or spin.  Stay connected as you move to the next exercise. 

8.    Once you’ve completed all the exercises and leave the ring, don’t just put the dog away.  Pay special attention to her before you reconvene with friends or take a break yourself.  Play with her, take her for a walk, give her a special bone, etc.  Each time you show, you are setting up for the next time, so make sure your dog leaves every show – however well or badly it went – with an upbeat attitude.

9.    Remember you decided to do this sport, not your dog.  He has no idea about qualifying scores, blue ribbons or OTCH points.  .

10. Smile!  It’s only a dog show.  

0 Comments

August 21st, 2014

8/21/2014

0 Comments

 
Picture
“

0 Comments

Proof Positive - Solidifying Understanding

8/21/2014

0 Comments

 
Proof Positive – Solidifying Understanding

By Mary Horne, CPDT-KA

Competition Obedience Training Director

Thoughtful “proofing” is an important step toward achieving ring-ready reliability…. or behavioral reliability in any context.  As the term implies, it is designed to check for errors (in this case, of understanding) and thus build the dog’s confidence, not diminish it.  Some (in my opinion) take proofing to an unfair or absurd extreme. Others don’t do enough, for fear of causing the dog to fail.

Done well, proofing can be a fun and rewarding game for both dog and handler.  “You can’t fake me out with that trick!” wags the well-proofed dog in the face of a distraction!  It’s a happy moment when you see that light bulb go on.

Here are some important things to keep in mind when crafting your plan:

  • Proofing is designed to build confidence, never (ever!) to scare or completely flummox the dog.  Add elements of proofing in small enough steps that the dog has at least an 80% chance of performing the exercise correctly.  Then increase difficulty or complexity, as needed. 

  • Proofing should begin once the dog has clearly demonstrated a solid understanding of the concept and mechanics of an exercise – or piece of an exercise – in a quiet environment.  Proofing necessarily increases the difficulty of the task.  Adding variables before the dog is able to perform the desired behavior with certainty and confidence will lead to confusion.    

  • Have a plan for dealing with “failures.”  At a certain point, proofing will tend to cause errors.  That’s good!  Mistakes are an important part of learning. Helping our dogs understand what isn’t right helps clarify for them what is right.  However, it’s critical to know exactly what you’re going to do when the error occurs and how you’ll set up the next repetition so your dog benefits from the experience.

Say, for example, you’re working on reliability for your dog’s “sit”. You could ask your dog to sit …

·         In different locations - indoors, outdoors, at strip malls, parking lots, airports, dog shows, large open fields, small enclosed spaces, outside fenced dog parks, etc.

·         On different substrates - grass, tile, woodchips, roads, raised surfaces (stone walls, picnic tables), plywood

·         Around different sounds - crinkling baggies, applause, music, doors opening/closing, airplanes, wind, kids playing, taped noise (barking, dog show noise, babies, cats, etc.)

·         Near other dogs – dogs doing recalls, retrieves, jumping, stays, dogs being removed from the line during group exercises, etc.

·         With you in different orientations – you sit, lie down, face away, bend down … or at different distances from you

·         Around staged distractions – placing a treat pouch, bits of paper, stuffed animals,  covered food bowls on ground,  hanging toys,  putting smelly food on a table

·         In proximity to other humans – people playing “judge”, following during heeling, standing behind dog setting up for recalls, wearing rain gear, neckties, sun hats, holding clipboard, “spectators” clapping, eating, on crutches, etc.  ** Important note:  Be certain to clearly instruct any human helpers on EXACTLY how you want them to help, and what to do if the dog isn’t successful.  They need to know when to back off if your plan proves too difficult for your dog.  Bad human help can be far worse than no human help!

Again, be certain none of these things scares your dog! If she worries that something bad is going to happen during an exercise, she will not be able to perform it with clarity and confidence.

Finding the right type and amount of proofing for each individual dog requires planning and care but is well-worth the effort.  Have fun with it!

0 Comments

First there came focus ...

8/21/2014

0 Comments

 
The topic of focus is near and dear to my heart.  Focus (or attention, engagement - call it what you will) is the fundamental building block for everything we do in obedience. When you have it with your dog, everything else flows.

Yet so many people don’t have it, although they persist in trying to advance in training their dog’s other obedience skills without solidifying focus first.  Many newer trainers seem to almost take it for granted, wondering why their dogs scour the floor, run off to visit other dogs, instead of coming, heeling, etc. when asked.    “He gets so distracted ___________ (outside, around other dogs/kids/smells/the floor at PCOTC – you fill in the blank),” or, “She does the exercises perfectly in class, but when we get to a trial, she checks out,” are common laments.

Focus is a learned skill that must be trained and reinforced just like any other --   strategically, systematically and in lots of different environments.  And once you get it, you still have to work it intermittently or it will deteriorate. Again, just like recalls or finishes or go-outs or any other behavior you want to keep fresh.

Here are some basics to keep in mind:

·       Dogs usually pay attention to what is interesting to them.  It’s our job to make that US!  Train and build value for attention as a separate skill.

·       When you are asking your dog for his attention, be sure you are fully giving him yours. No chatting with friends, reloading treats, watching an instructor demo as your dog patiently stares at you. 

·       To that point, make it clear to the dog when he is on and off duty. Use a clear release signal (“free”, “all done”, etc.), change your body posture, put your dog in “park” (down/settle/crate).

·       Maximize value for attention by letting your dog CHOOSE to attend to you and marking and rewarding him for it in a meaningful way (to him).  In the beginning, limit his opportunity to make incorrect choices or gain reinforcement from elsewhere.  Keep him on a short leash, work in a small area, move away from other dogs, etc.

·       Don’t talk, pay attention to or nag your dog when he’s doing something you don’t want.  Unless you correct the dog in a meaningful way, that nagging just teaches your dog to tune you out!  Set things up so he’ll be able to choose a correct response, and then praise and reward.

·       Think of building your dog’s “attention muscle” like building a healthy bank account. Steady deposits and minimal withdrawals yield the best results.  Set up for success, reward generously, add distractions thoughtfully.  Practice makes permanent; once your dog learns that paying attention has value, his attention muscle will rapidly gain strength.  Settle for mediocre focus and all of your training will suffer.

If you are mindful of your dog’s focus skills – and your own – you will be able to plan, train, reward, correct and build a relationship where the two of you are 100% engaged with one another, during training and in the ring.  Happy training!

0 Comments

    by Mary Horne CPDT-KA, CTC

    Archives

    November 2014
    August 2014

    Categories

    All
    Competition Training

    RSS Feed

Proudly powered by Weebly